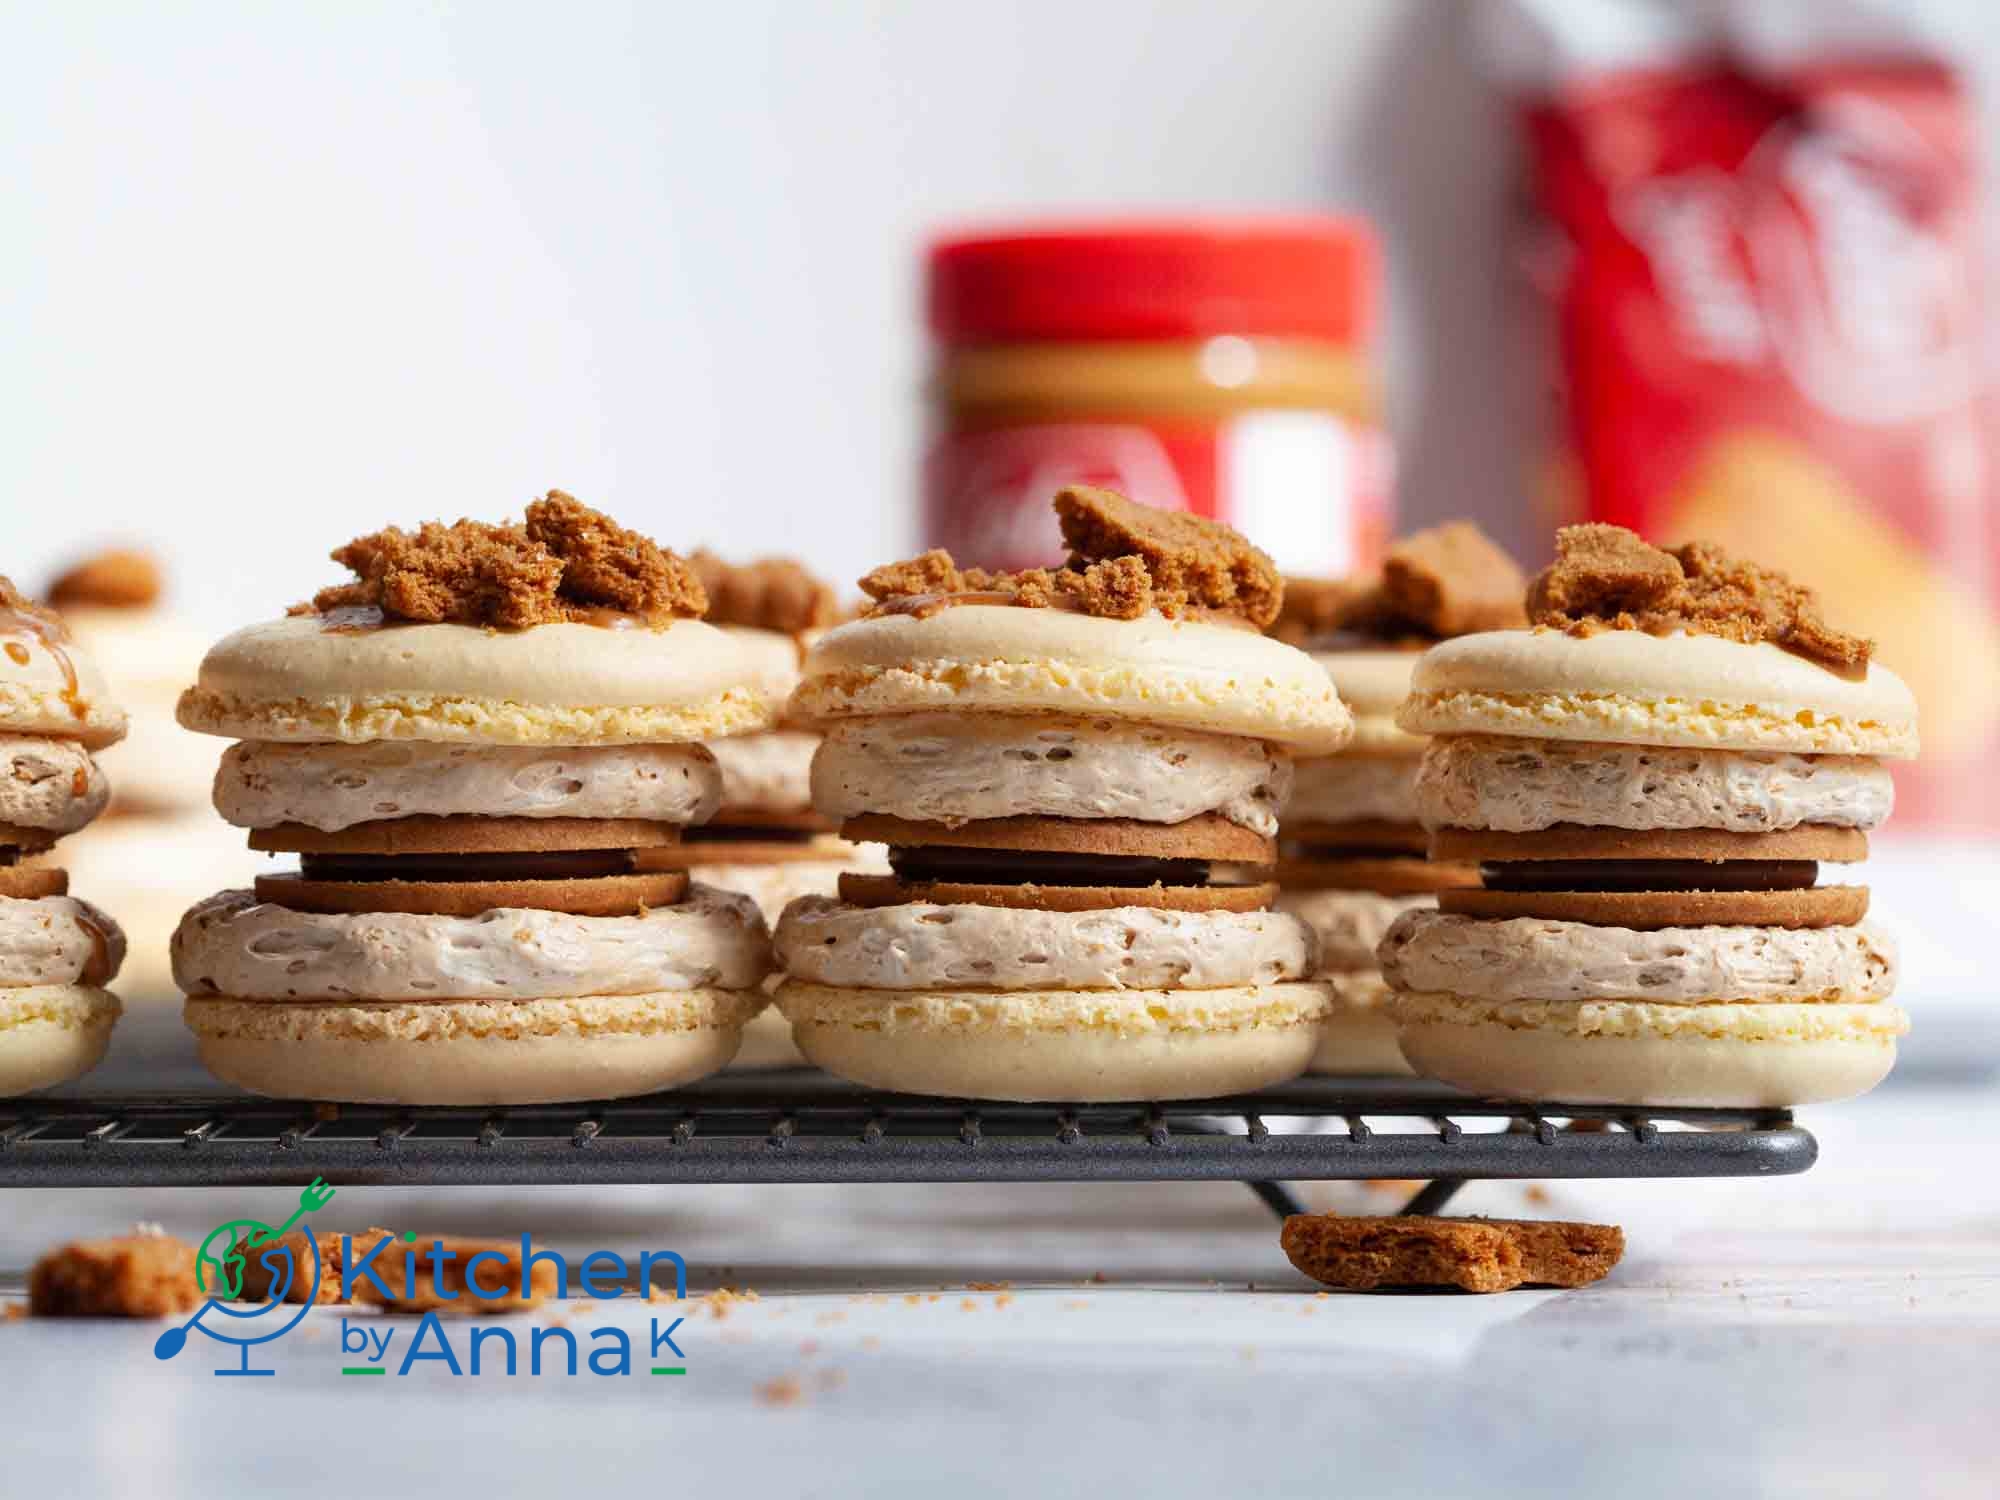
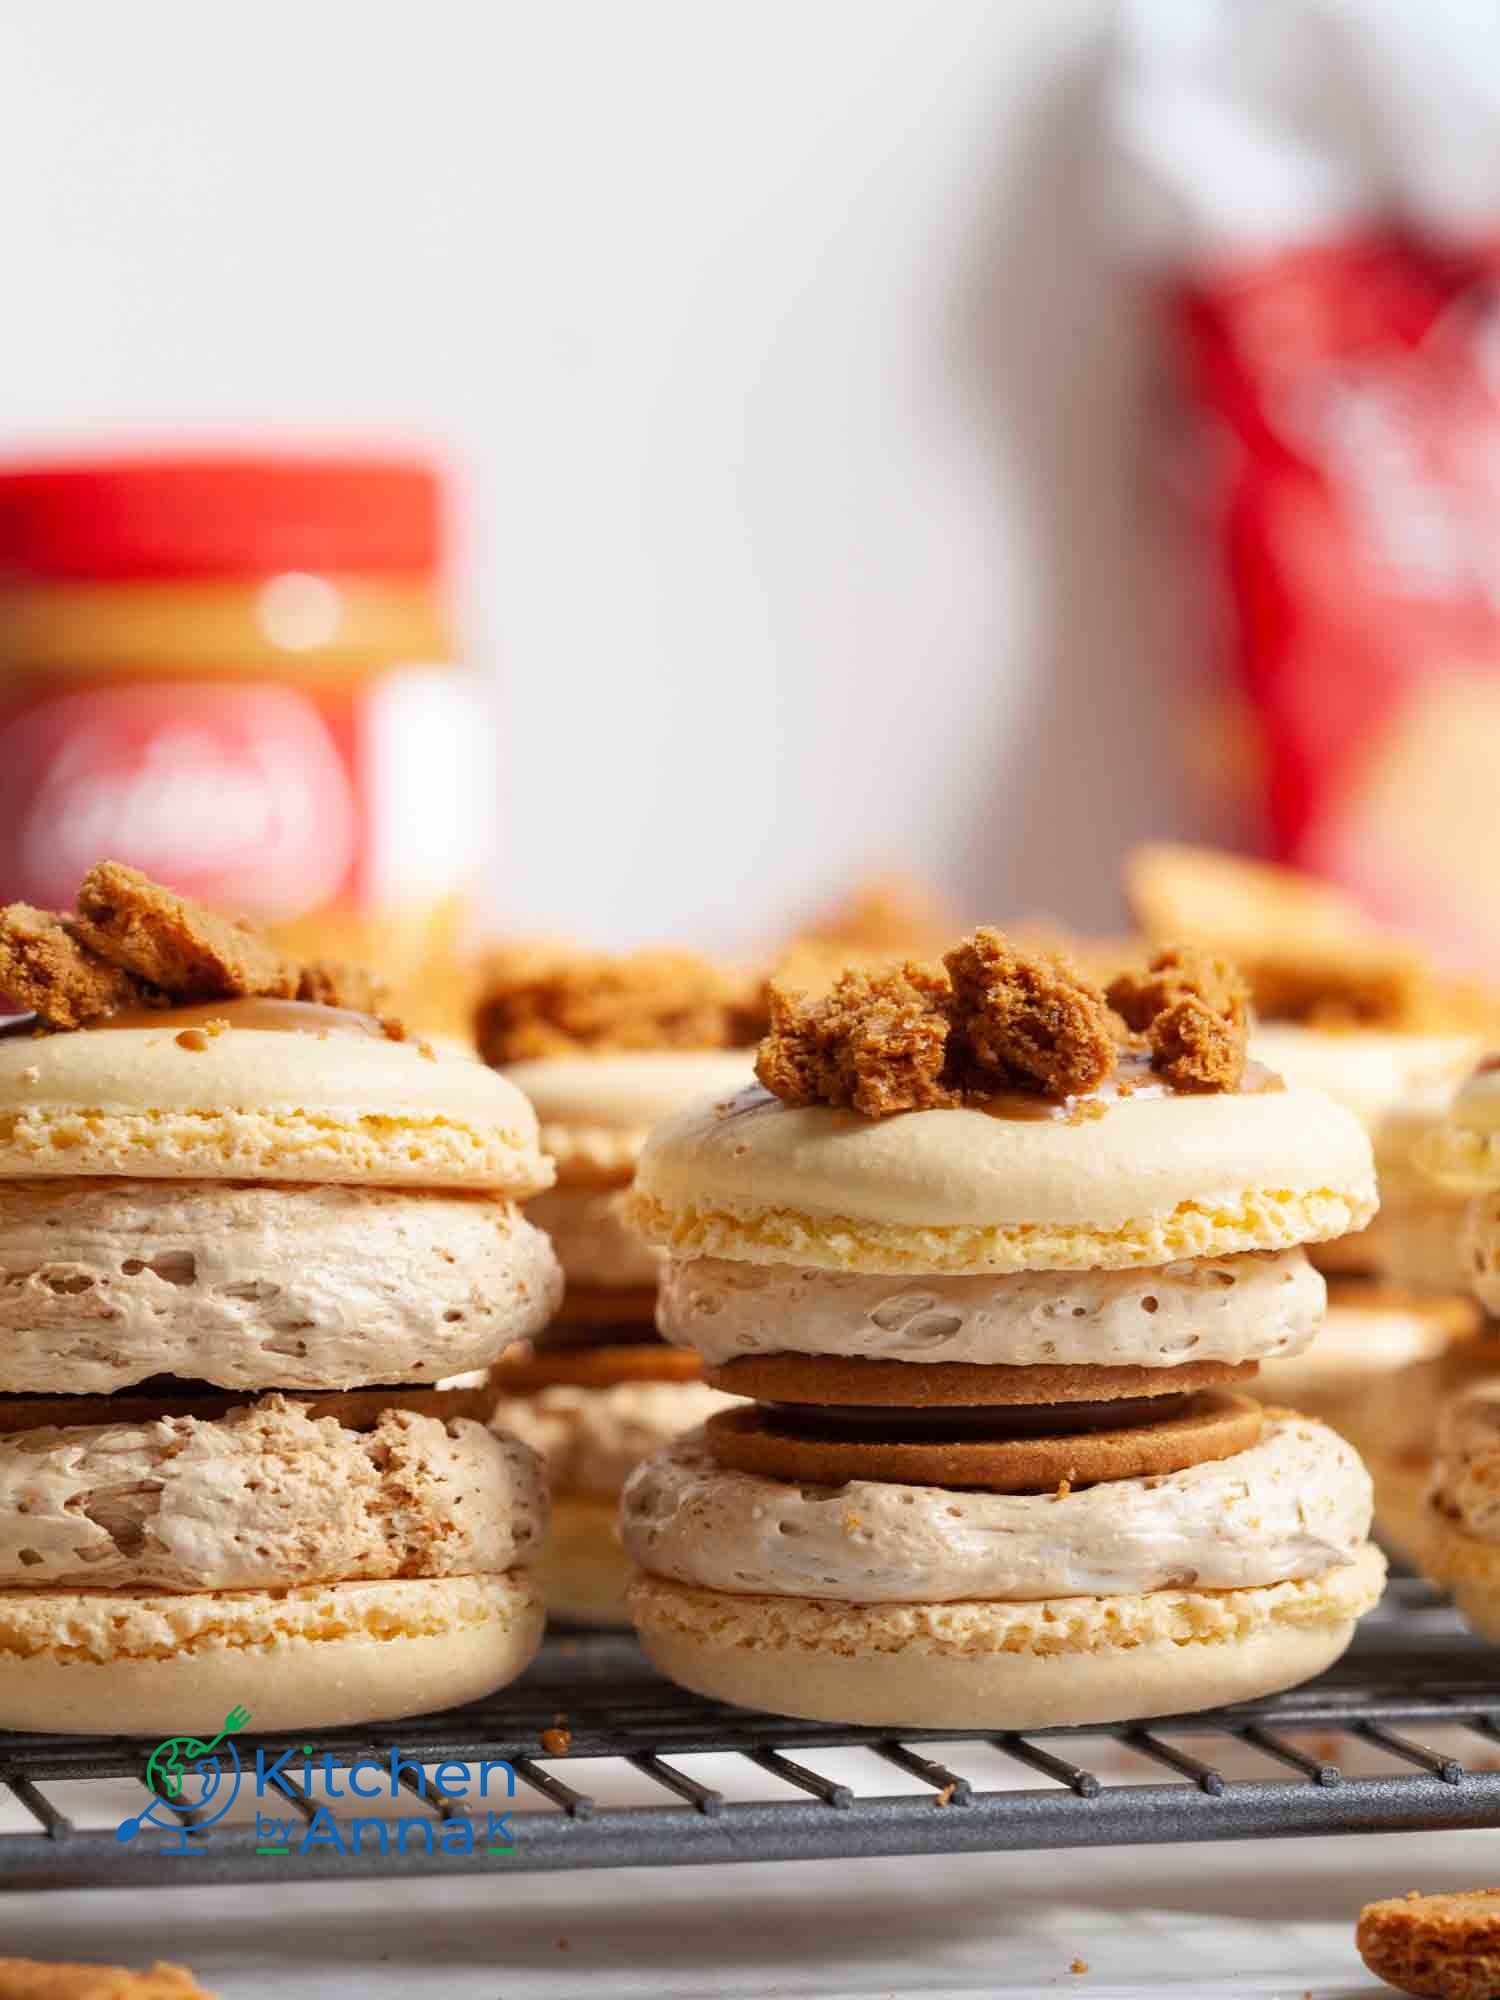
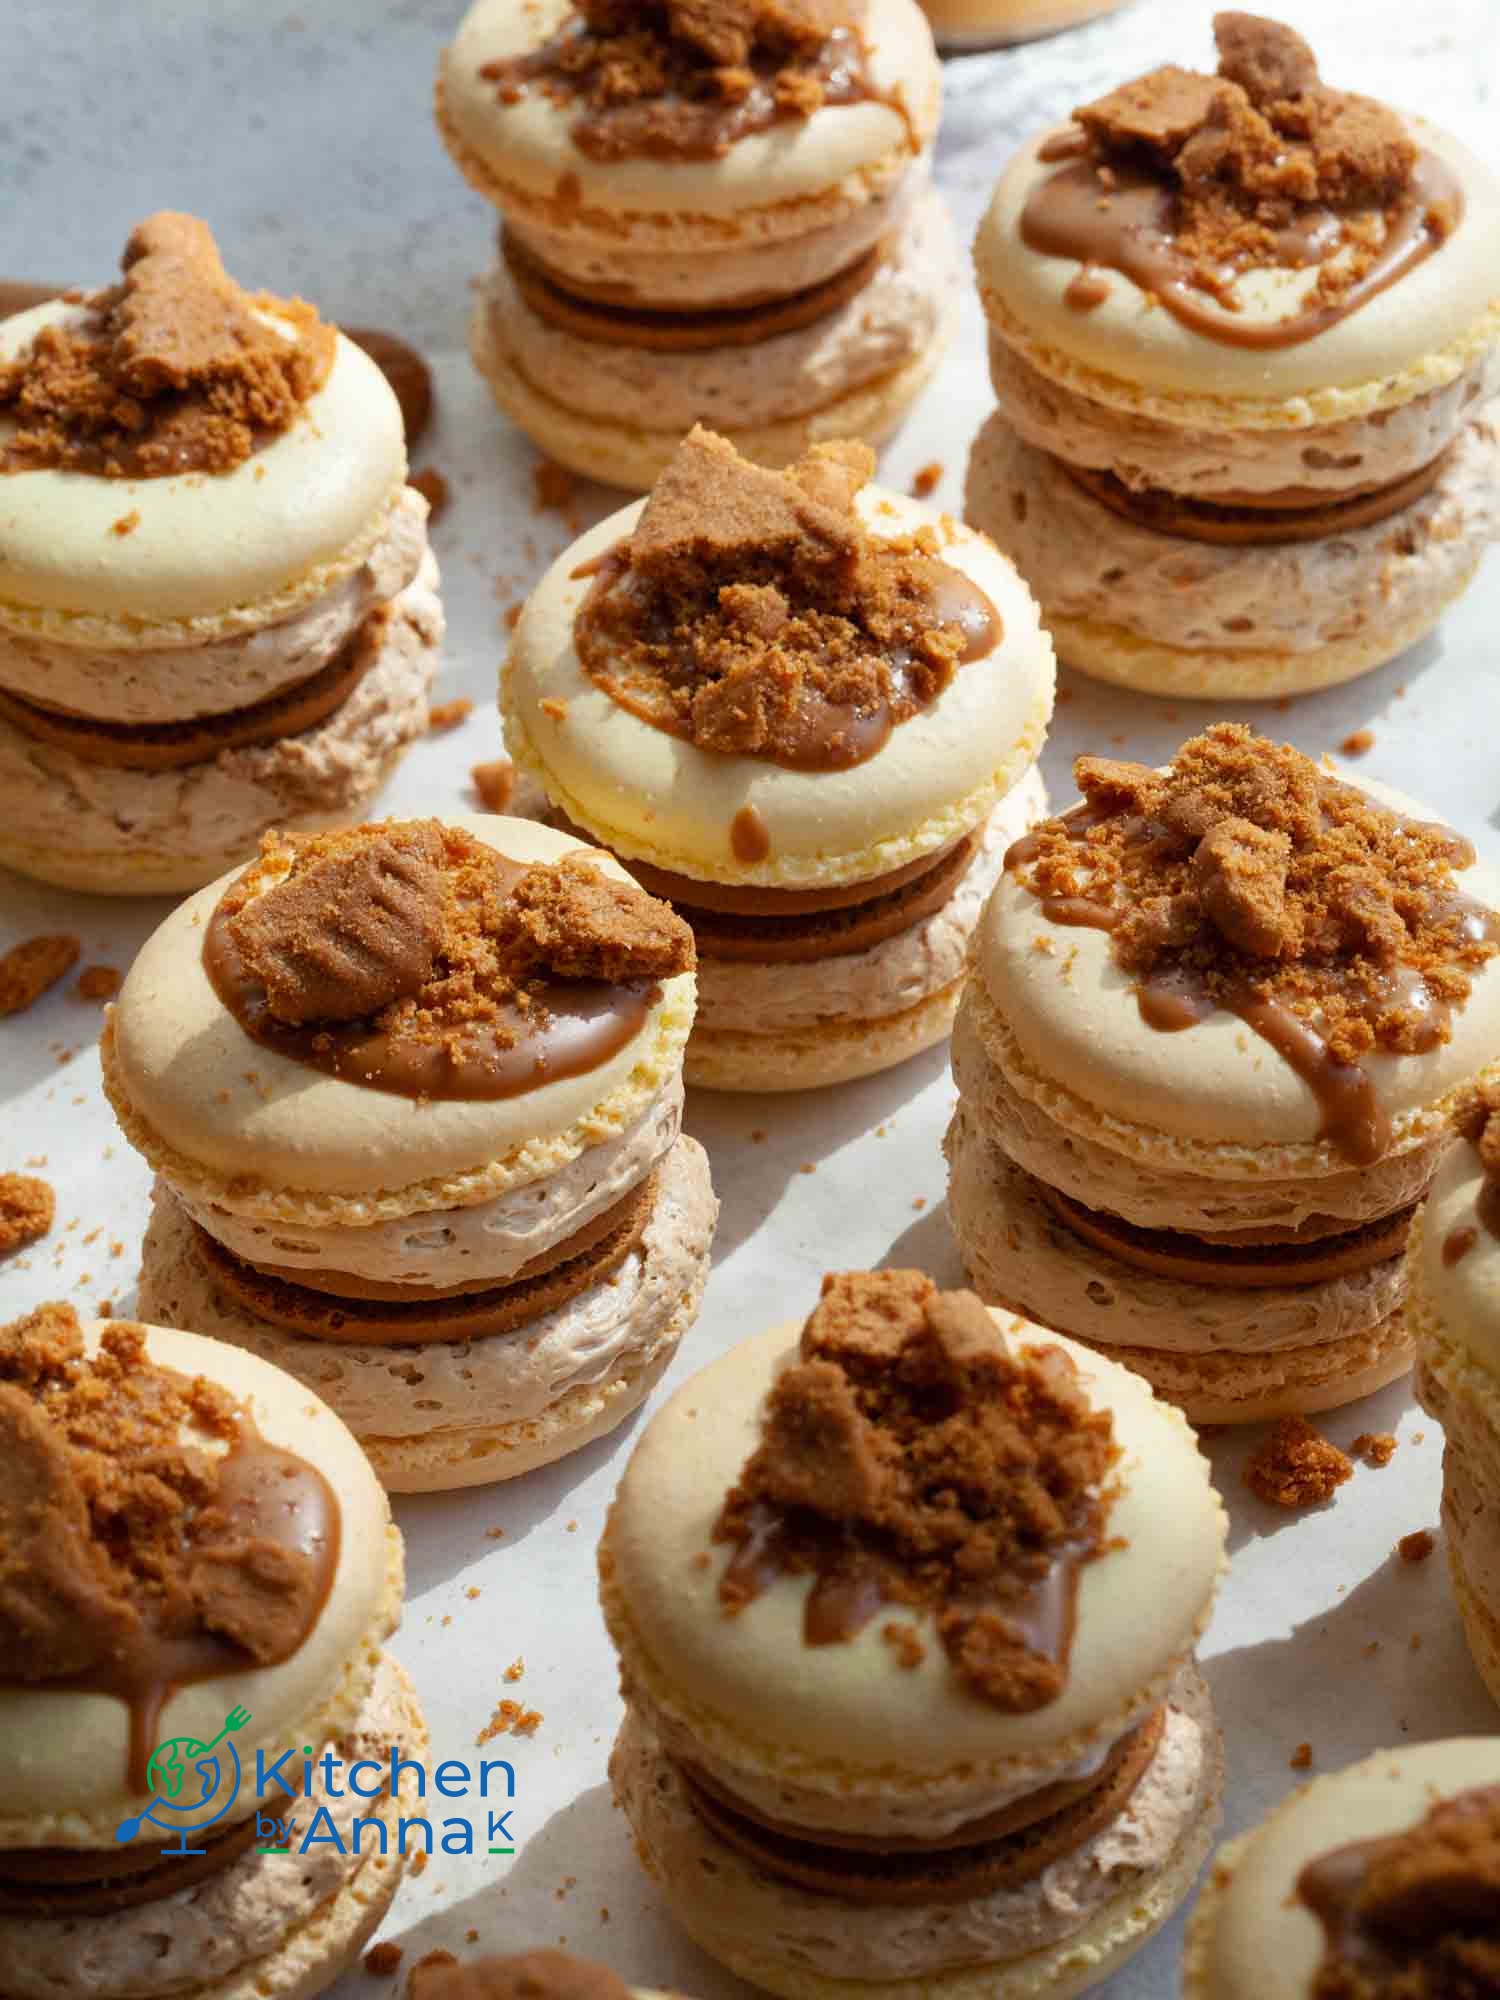
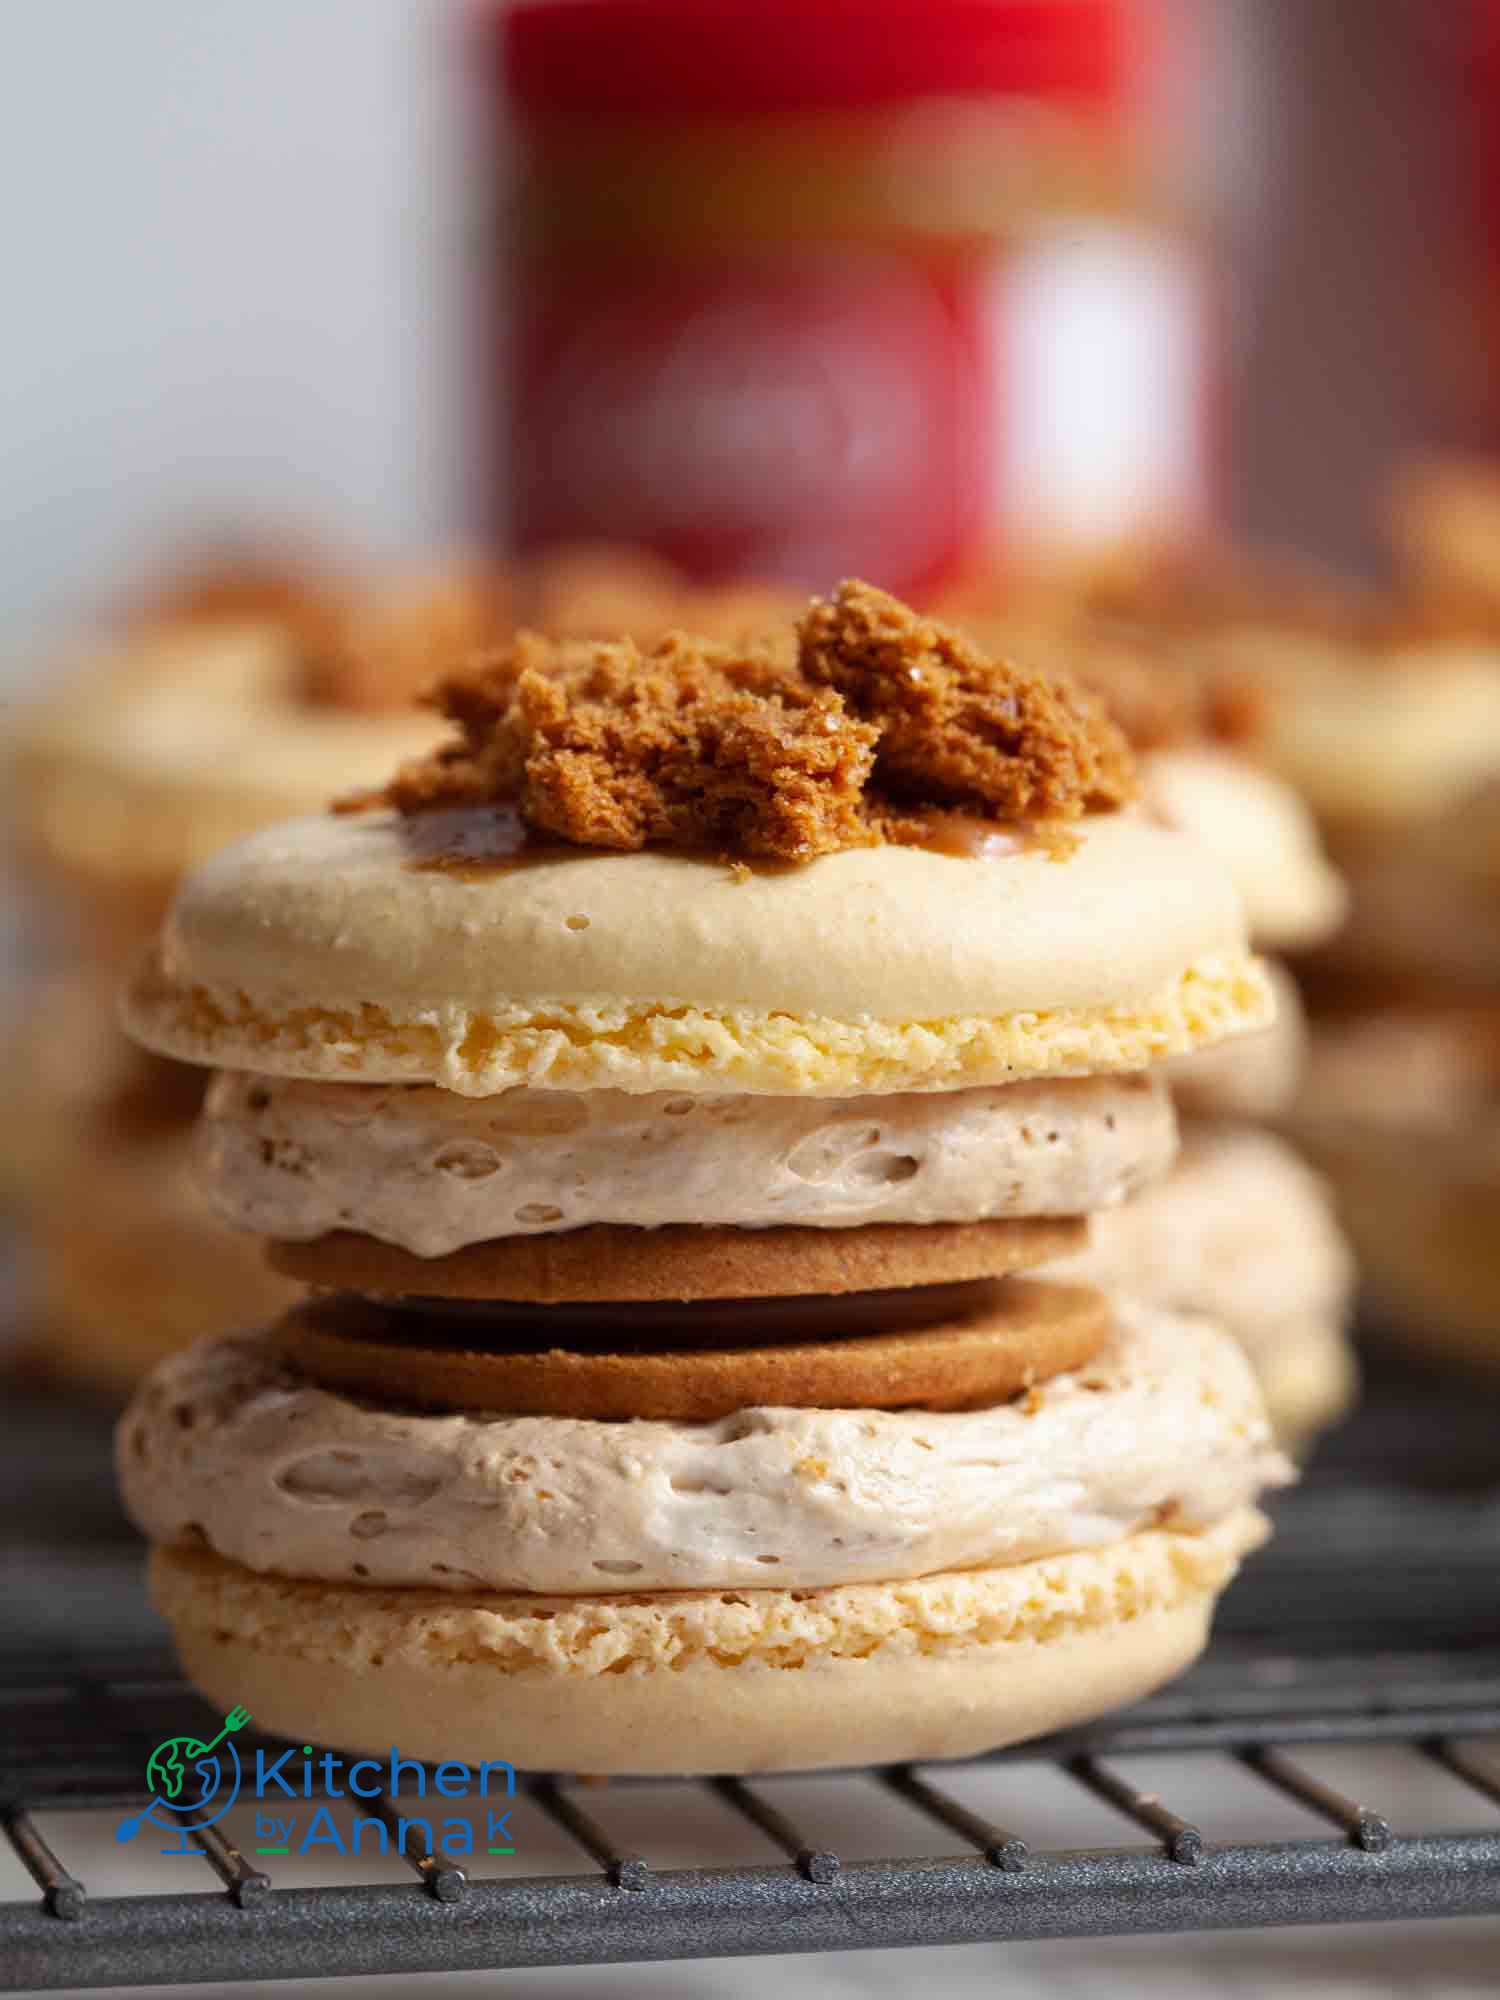
My new macaron recipe is incredible. Biscoff marshmallow fluff macarons – soft Italian meringue macarons are filled with Biscoff marshmallow fluff and have Biscoff cookie in the middle. Drizzled with melted Biscoff spread and crushed Biscoff on top. Heaven for all Biscoff lovers.
So, this recipe is easy and is based on the Italian meringue method. Yes, yes, people claim that this method is complicated. BUT, it’s really not! This recipe and method is straightforward and I always have the best results.
Why do I recommend making macarons by using the Italian meringue method?
The meringue is very stable and creates nice chewy and full cookie. I tried using the French meringue method, but had mixed results. I also tried using the Swiss meringue method, but for me it takes too long and also gives mixed results. I will continue testing using the French and Swiss meringue methods and when I am completely happy with the results I will share it.
Steps
1. Prepare almond and powdered sugar mixture.
2. Mix the almond mixture with one portion of egg whites.
3. Make meringue by combining sugar syrup with beaten egg whites. The consistency of Italian meringue should be smooth, silky and thick.
4. Add meringue to the almond paste and fold it together by gently mixing. Use a spatula for the best results. This step is called macaronage. The mixture should be thick but runny. The batter should effortlessly fall off from the spatula looking like ‘ribbons’.
5. Pipe macarons
6. Bake macarons

Tips when making macaron shells
Oven
I use a fan-assisted electric oven and bake macarons at 160C/320F. I have tested this recipe in a gas oven as well at 170C/338F and had good results. Every oven is different therefore you may need to adjust temperature and baking time to achieve the best results.
Baking tin/mat
I use large metal baking tins lined with baking paper sheets, this is what works the best for me. I only use the sheets – not rolls! I have tested those “special” silicone macaron mats and it was HELL! After 2 bad batches I binned them. I have also tried using standard smooth silicon mats and I was not happy with the results – my macarons were hollow and had no feet at all.
Ingredients
I am using normal white icing sugar: white granulated sugar and ground almonds. When it comes to food colouring, I use the gel-based stuff. I don’t recommend using any oil-based colouring as it will affect the meringue consistency.
Scale
Macarons are very technical. Therefore use a kitchen scale to weigh your ingredients for the correct ratios.
Thermometer
I recommend using a digital sugar thermometer to make sure that your sugar syrup reaches the correct temperature of 118C/244F.
Piping bag and nozzle
I use large round nozzles, Wilton 1A and large disposable bags. I tried silicone bags but was not a fan.
Time
As obvious as it sounds make sure you have enough time.
You can’t prepare macaron batter in advance, as it will thicken and become crunchy and unusable. I have tried this in the past – using batter a few hours old – and it was a disaster.
Also, if you leave macarons that have been piped for too long – over 2 hours – they will develop a thick film that will make them explode in the oven and turn into volcanos – done that as well!
Do Not
- Add liquid or oil-based food colouring. Use a good quality paste, gel or powder. Remember, if you add too much, your macarons may wrinkle and develop a bad aftertaste.
- Leave the piped macarons for too long – 2+ hours – the film on top will become too thick and they will explode.
- Overmix the batter. During the process of macaronage, go slowly and check for the right consistency often. If you overmix the batter, the macarons will not hold their shape. When you pipe them they will become flat like pancakes. If you try to add more almond flour to rescue it, it will likely not work.
- Undermix your batter. You can still use it but it will make it difficult to achieve nice macaron shapes. It will also make them more crunchy.
- Open the oven door for the first 8 minutes of baking.
- Remove hot macarons from the baking sheet – they will stick and you will ruin them. Yes, I learn this lesson as well! When the macarons are ready, remove them from your oven and let them cool down completely! I recommend leaving them for at least 40 minutes and then you’ll have no problem removing them.
- Worry: if your macarons do not turn out perfect. Small feet, big feet, no feet, not perfectly round – it really doesn’t matter. It’s the flavour that counts!
Do
- Be prepared and organized: read the full recipe before making. Make sure you have enough baking trays and space in your kitchen.
- Bake using two trays at a time if you have space. This is what I do and it never affected my macarons. I do not rotate baking trays.
- Buy a kitchen scale and a sugar thermometer. This equipment is crucial to make this recipe.
- Make the filling a day before. You can make macaron filling a day before and store it in the fridge.
What does maturing macarons mean?
Maturing macarons is nothing more that letting the filled, finished cookies rest in the fridge. The purpose is to let the flavours blend and the shells soften. The texture of the shells should change from being crunchy to being more soft, melt-in-your-mouth. It usually takes a day or two depending on the filling.
Important
Any ‘wet’ filling will dissolve macaron shells, for example cream cheese, mascarpone cheese, curd, wet buttercream, jam, whipped cream etc. These macarons need less time to mature, they are best when eaten the next day or day after. Later on they will become wet. Still tasting good but will become soggy and will not look very appetizing.
If you want them to last longer try filling them with a more stable filling: like ganache or powdered milk and coca frosting, toasted walnut buttercream frosting, Italian meringue buttercream frosting etc. Macarons filled with ganache etc will last in the fridge for up to 7 days.
Also, check for levels of humidity in your fridge and condensation – these two factors will affect macarons as well.
Can I prepare the filling in advance?
For this recipe, I would not recommend making marshmallow fluff in advance. I think the consistency is better when it is just made and it is easier to pipe as well. To fill these mellow yellow macarons I made gooey and addictive Biscoff marshmallow fluff. Honestly you need to check out this recipe.
What do Biscoff marshamallow fluff macarons taste like?
These macarons are the bomb! If you adore Biscoff cookie spread as much as I do you need to make this recipe. These macarons are loaded with Biscoff flavour. Biscoff marshmalow fluff is gooey and smooth and Biscoff cookie in the middle adds extra crunch. I think I should call these Biscoff marshmallow fluff macarons – Triple Biscoff marsmallow fluff macarons!
How to store Biscoff marshmallow fluff macarons
Store unfilled macarons shells in a fridge, in an air-tight container, for up 2 weeks. You can store filled macarons in a fridge for up to a week. I would not recommend freezing these Biscoff marshmallow fluff macarons as the filling is meringue based.
Please keep checking my blog as I will be expanding my macaron menu and I am sure you do not want to miss any new exciting flavour like:
Maltesers and powdered milk frosting macarons
Amaretto white chocolate piniata macarons
Matcha black sesame crunch macarons
Chestnuts and white chocolate macarons
Click here to see all my macaron recipes!
I hope you will make my recipe and if you do, please leave a comment below and let me know your feedback. You can also find me on social media such as Facebook, Instagram, Pinterest, Gab and Gettr. Please say hi and do not forget to tag me in if you make my recipe. I love seeing your creations.
Recipe source – Recipe for the shells comes from Cupcake Jemma, macaron filling is my own idea.
Bon appétit!
Ingredients
Macarons
Biscoff marshmallow fluff
Toppings
Instructions
Making macaron shells
-
Prepare all your ingredients and a kitchen scale.
-
Prepare one medium bowl, small bowl, one small pot, sugar thermometer, hand mixer with a whisk attachment.
-
Prepare 4 baking sheets lined with baking paper. Set aside.
-
Prepare piping bag fitted with a large round piping tip and a tall glass. I use piping nozzle, Wilton 1A.
-
Prepare food colouring of your choice and tooth picks or kebab sticks that you will use to distribute your colours with.
-
Add powdered sugar and ground almonds to a food processor and PULSE about 16 times. This will be enough to combine your sugar and almond flour. Please do not over process your dry mix as it will become oily. As a result your macarons will have very fragile shells and will have ugly oily stains.
-
Sift the almond mix to the medium bowl and add 72g egg whites. Add a drop of food colouring and mix all the ingredients well. You are aiming for a soft paste consistency. Cover the bowl with kitchen towel and set aside.
-
In a small pot add together white granulated sugar and water, mix and then turn the gas on and start to heat up the sugar mixture. Do not stir sugar mixture at all from this point!
-
Using sugar thermometer, keep checking the temperature. IMPORTANT! You will be aiming for 118C/244F and this is when you stop heating up the sugar mixture.
-
But now, before the sugar mixture reaches 118C/244F, you start to slowly whisk up the remaining 72g of egg whites until egg whites form hard peaks.
Start to whisk them when the sugar temperature begins getting higher. Basically you need to multitask. Beat the meringue to hard peaks and get the time for sugar to reach 118C.
-
When sugar reaches 118C/244F and you have hard peaks in your meringue, take the sugar mixture from a hob and slowly start pouring the sugar mixture on the side of the bowl with your meringue.
-
While you are pouring sugar mixture , turn on your mixer on medium and start mixing meringue and sugar syrup.
-
Start whisking the meringue slowly and then after a minute start whisking on the highest setting.
-
You should be whisking for about 6-8 minutes until you get a medium, floppy peaks. You just made Italian meringue, well done. It is important to notice that the bowl should cool down and the temperature of the meringue should go down after whisking.
-
Take a spoon of meringue and add it to the almond paste mixture. Mix vigorously to loosen up the almond paste.
-
Then add 2 more spoons of meringue and slowly mix together. Use flat spatula and go in one direction, pressing the batter to the sides of the bowl. This step is called macaronage.
-
Keep adding the remaining meringue and keep folding the mixture together, going slowly. This will help to avoid creating air bubbles in the batter.
-
Now, you are aiming for a smooth almond meringue batter that falls from your spatula like a ribbon.
-
IMPORTANT , do not overmix the batter, if you overmix it, your macarons will go flat as the batter will not hold its shape. You can not rescue the batter if you overmix it. It is better to go slowly and stop every minute to check the consistency. If you undermix, you can still make macarons but it will be difficult to pipe batter into consistent shapes.
-
Once the consistency is right, you can transfer the batter to the piping bag.
-
Holding the piping tip about 1cm from the baking sheet, keep squeezing circles, aim for smaller sizes as the batter will spread a little bit.
-
When you finished piping your macarons, take each baking pan and bang it on a kitchen counter - this will help to expose all air bubbles hidden in the batter.
-
If you notice any air bubbles, take a tooth pick etc and gently pop the bubbles. This step is optional. If you leave the bubbles, macarons will still taste good, I do it simply for the aesthetic reasons.
-
Now, you need to leave the macarons and let them to dry until you will notice a kind of film on top. Basically if you touch the top of a macaron with your finger it should not be sticky anymore. Please notice you can not leave macarons for too long, like an hour or so as the film will be very thick and they will explode in the oven and turn into volcanoes. I have tried it!
-
Preheat the oven to 160C/320F Fan and bake macarons for 12 min. Please notice, I use electric oven with fan. I have tested this recipe in gas oven and it worked just fine. But you need to check what temperature works best for you.
-
Important, when macarons are ready, remove the baking sheet from the oven and let macarons to COOL DOWN COMPLETELY before removing them from the baking sheet. If you do not wait, you will ruin your macarons and they will be stuck to the baking paper. This is a normal process. Just wait!!!
-
Then move macarons on a cooling rack.
Macarons filling
-
Make marshmallow fluff using this recipe http://kitchenbyannak.com/recipe/biscoff-marshmallow-fluff/
Assembling macarons
-
Spoon marshmallow fluff to a pipping bag with pipping nozzle.
-
Pipe fluff on a macaron, place round Biscoff cookie and then pipe second layer of fluff. Place second macaron on top.
-
Melt Biscoff spread and drizzle on each macaron. Sprinkle some cookie crumb on top.
-
Store in a fridge for up to 7 days. I do not recommend freezing these macarons as filling is meringue based.